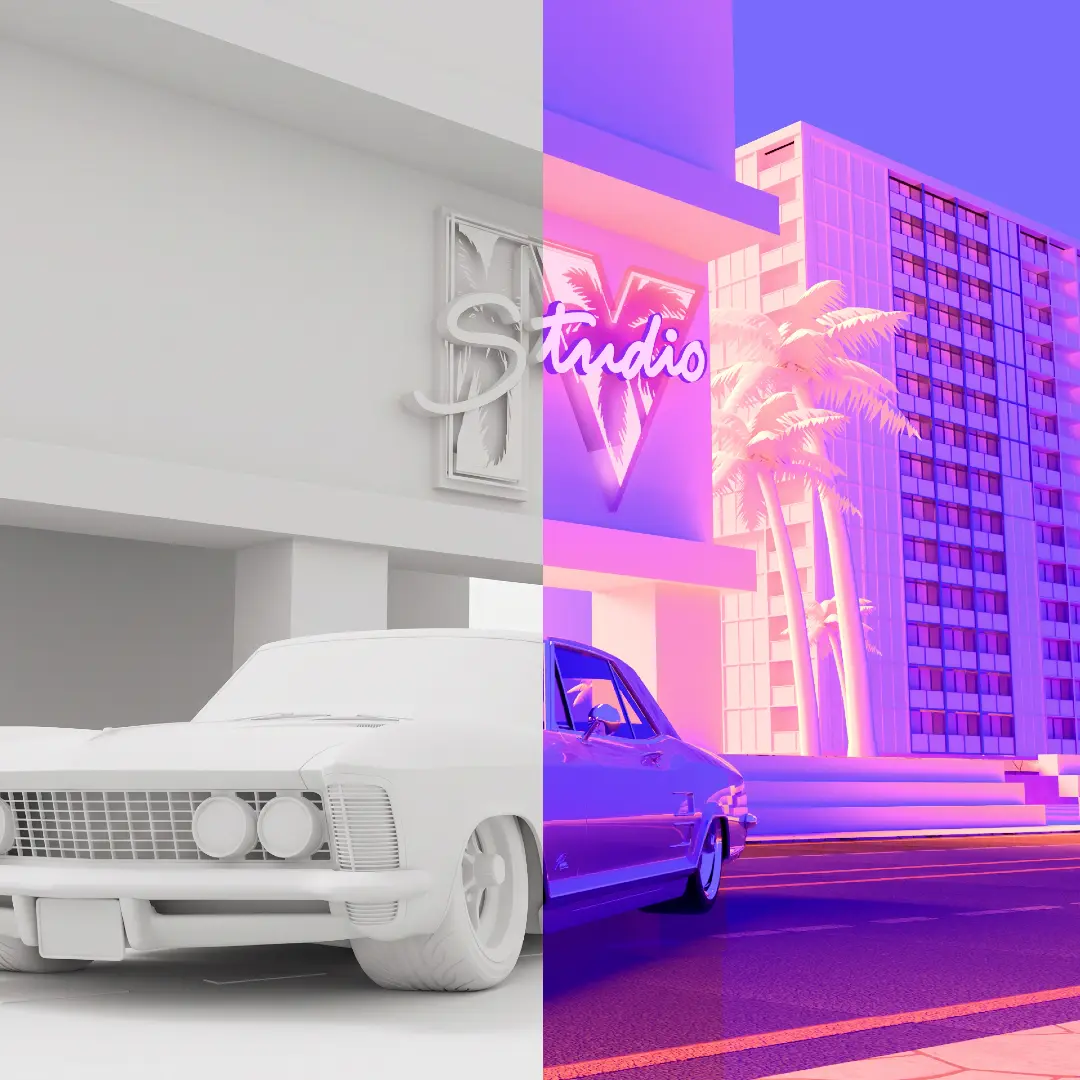
Everyone was waiting on the GTA VI trailers, and so were we. Somewhere in a late-night edit one of us asked what our studio would look like in Vice City. A week of evenings later, it looked like this.
Every model, material and light in these frames was made by hand in Blender. No image generators, no AI upscaling, no store-bought scenes passed off as ours. We wanted to prove to ourselves we could still do the whole thing, start to finish.
Why a studio that shoots films made a 3D scene
Most of our work is live action. But more and more briefs include a shot no camera can get: a product that doesn't exist yet, a logo that needs somewhere to live, a street you can't close for a day. 3D is how we answer those, and a personal project is the safest place to sharpen it.
We also just love the look. That pink-into-violet sky and those sunburnt pastels are one of the most recognisable colour palettes in games. Trying to match it teaches you more about light and colour than any tutorial.
“Clients don't pay for software. They pay for a picture they can't get any other way. Projects like this are how we find out what that picture can be.”
Step 1: grey clay first
Before any colour, the whole scene lives as plain grey clay: a hotel tower, a low wall with the sign, a row of palms and the car. At this stage we only care about shape and composition. Is the car low enough? Do the palms frame it? Does the tower pull your eye up?
It's the same thinking as blocking a live shoot. If the frame doesn't work in grey, no amount of neon will save it.
Step 2: the car
The car is a mid-sixties American coupe, dropped almost to the ground, with a long hood, a split grille and chrome wheels. It took the most time by far. Cars are unforgiving: one wobbly panel line and the whole thing looks like a toy.
We modelled it in pieces (body, glass, chrome trim, wheels) and kept the reflections honest, so the chrome picks up the pink sky and the neon around it.
Step 3: the neon IV Studio sign
The sign is our little nod to the famous logo: an IV for Ivy, palm leaves cut into the letters, and 'Studio' looping across it in script. It's real geometry with glowing materials, so it lights the wall and the car the way a real sign would.
Step 4: light it like a sunset
Lighting is where a model turns into a place. We worked with a warm, low sun, a violet sky and a couple of soft pink fills, then let the neon do the rest. Most of the mood comes from letting the shadows go deep blue instead of black.
“The fun part was keeping the scene light enough to move. Every palm and window counts when you want to turn a still into a camera move later.”
What we learned
- Block it in grey first. Composition problems are cheap to fix before there's colour on anything.
- A limited palette is a feature. Two or three hues, pushed hard, read more 'GTA' than every colour at once.
- Reflections sell the car. Get the chrome and paint right and the model looks twice as detailed as it is.
- Doing it by hand means we can change anything. When a client wants their product in the frame, we model it and drop it in.
Could this be your brand?
This was a passion project, but it's the same process we use for product shots, logo reveals and places that don't exist yet. If you want your product parked outside a neon hotel, or somewhere stranger, that's exactly the kind of brief we like.
Ivy Studio is an independent video production studio in Kathmandu. GTA and Grand Theft Auto are trademarks of Rockstar Games; this is a fan-made tribute, not affiliated with or endorsed by them.
Questions people ask
Was this GTA VI-style scene made with AI?
No. Every model, material, light and render was made by hand in Blender. No image generators or AI upscaling were used.
What software did you use?
Blender for everything: modelling, materials, lighting and rendering.
Can Ivy Studio make 3D scenes for brands?
Yes. We make 3D product shots, logo animations and full scenes, and can combine them with live-action footage we shoot in Nepal.
Planning a shoot? Tell us about it — or see what we've made.